To install the sensor, follow the steps below:
- Sensors are turned on by default unless otherwise agreed. If off, follow this guide to switch them on.
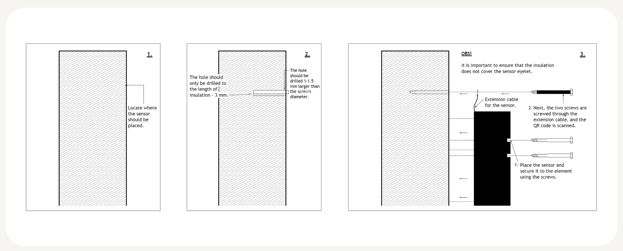
- Identify the desired installation area on the timber.
- Orient the sensor such that the “eyes” of the sensor are directly on where you wish to monitor.
- Place 2 of the accompanying screws into the “eyes” of the sensor. Sensors must always be installed with accompanying screws in order to have valid measurements.
- Using a drill, fasten the sensor onto the timber surface via the screws.
- Optional: Secure the sensor using the top cover.
- Register the sensor

Sensor with only insulated pins
When you are installing a sensor with only insulated pins, then always predrill holes for the screws with the following specifications:
- the length of the insulation minus 20 mm (e.g. if the insulation on the screw is 45 mm then predrill a hole that is 25 mm)
- 1mm - 1.5mm thicker than the diameter of the screw

Sensors with extensions and insulated pins
When installing sensors with extensions and insulated pins, select the place where the pins will be located and predrill holes with the following specifications:
- the length of the insulation - 3 mm (e.g. if the insulation on the screw is 45 mm then predrill a hole that is about 42 mm in length)
- 1mm - 1.5mm thicker diameter than the diameter of the screw
When installing a sensor with an extension, it’s important to remember the accompanying metal and PVC washers in between the extension and the timber to prevent surface readings.

The correct order of installation, as shown in the illustration below, is to place the PVC washer closest to the wood, then the metal washer, then the eye of the extension and finally the screw at the very top. Make sure you are not installing the pins at an angle- they should be perpendicular to the surface, so the insulation doesn’t tear.

When installing the pins, remember to ensure that:
- The head of the screw has contact with the metal plate in the eyes of the sensor or with the metal washers
- The pins are not measuring across panels of timber in, for example, LVL