Step-by-step guide to setting up your Tector gateway
- Prepare gateway by attaching the antennas that come along in the Accessories box.
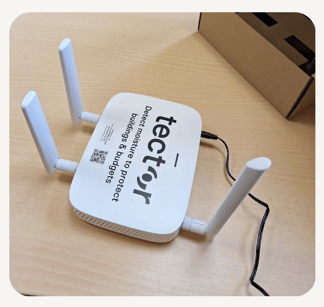
- Plug gateway into power and ethernet:
-
- Power connection: Plug the power cable into a power socket.
- Ethernet connection: If possible, connect an ethernet cable to the gateway for a more reliable connection. While the gateway typically uses a SIM card for connectivity, an ethernet backup is recommended, especially in areas with poor mobile signal.
- LED light: The LED light on top of the gateway will turn blue to signal that the gateway has established connection.
-
Choose the best location:
- Optimal placement: Place the gateway as high as possible to ensure optimal coverage.
- Avoid interference: Keep the gateway away from aluminum, steel, glass, and other materials that inhibit radio frequency signals. Do not place it in a typical internet router box.
-
Scan the QR code and complete setup:
- Scan QR code: Use your phone’s QR reader to scan the QR code on the gateway.
- Describe location: Describe the gateway’s location and upload a photo of the gateway and its surroundings for future reference.
Adding gateways to a subgroup

If you want to add a gateway to a subgroup, simply go to the Gateways tab on the group page, press Add/remove gateways and type in the ID of the gateway and press Update.
Important tips
- Ensure the gateway is placed in a location where it will not be unplugged in the future.
- For reliable connectivity, an ethernet backup can be useful, especially in areas with poor mobile signal.
- Proper placement away from signal-blocking materials is crucial for optimal performance.
- We recommend turning on the gateway as soon as you have received it in order to preserve sensor battery life.
Troubleshooting
- If the gateway is not set up correctly after scanning the QR code, you will not receive alerts if it goes offline. Ensure all setup steps are followed carefully to maintain connectivity.
By following these steps, you can ensure your Tector gateway is set up correctly for reliable and optimal performance.