What are insulated pins and when to use them?
Insulated pins are used to measure the wood moisture content at a specific depth or to avoid high spikes in moisture readings caused by surface water. Without insulated pins, the sensor will measure the wood moisture content, where the moisture is the highest between the two pins.
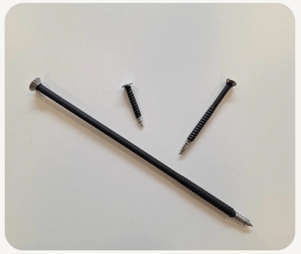
Mounting sensors with only insulated screws
1. Predrill holes for the insulated screws
When you are installing a sensor with only insulated pins, then always predrill holes for the screws with the following specifications:
- the length of the insulation minus 3mm (e.g. if the insulation on the screw is 20mm then predrill a hole that is 17mm)
- 1mm - 1.5mm thicker than the diameter of the screw

2. Install the sensor
Make sure you are not installing the pins at an angle- they should be perpendicular to the surface, so the insulation doesn’t tear.
Orientation
- Rain exposure: If the sensor will be exposed to significant rainfall, place the sensor upside down so that the measuring pins are pointing towards the ground.
- Normal conditions: Otherwise, place the measuring pins with the timber fibers.
3. Register the sensor
- Scan the QR code with your phone’s camera and follow the setup instructions.
- Fill out the location details, choose the sensor type, and upload two photos: one from a distance and one from +2 meters away.
- Fill out tags or copy from previously installed sensors.
- Note the sensor’s placement and ID on a physical blueprint, then attach the sensors to the corresponding locations on the digital blueprint in the application on your computer.
Important tips
- Ensure the head of the screw contacts the metal plate in the sensor’s eyes.
- Avoid placing sensors across timber panels.
- Register sensors accurately to ensure proper monitoring and data recording.
By following these steps and tips, you can ensure accurate moisture monitoring for your timber structures and avoid common installation mistakes.