---
title: Create new alert rules
description: This article covers how to create new alert rules in the Tector app
---
[Skip to content](https://help.tector.com/create-new-alert-rules#main-content)
English
Show submenu for translations
[](https://www.tector.com/)
- [Home](https://help.tector.com/)
Open main navigation
Close main navigation
- [Home](https://help.tector.com/)
- English
Show submenu for translations
- [Contact us](mailto:support@tector.com)
[Contact us](mailto:support@tector.com)
How can we help you?
- There are no suggestions because the search field is empty.
1. [Help center](https://help.tector.com/)
2. [Software](https://help.tector.com/software)
3. [Alerts and alert rules](https://help.tector.com/software#alerts-and-alert-rules)
# Create new alert rules
## It can be useful to set up alert rules that are tailored to the specific needs of your project. You can easily do that on the Tector app and this article will teach how to do it in a few quick steps.
### **Watch video here, or keep reading text below:**
### **To set up custom alert rules:**
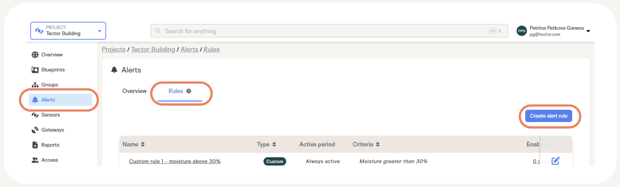
- Go to **Alerts** in the sidebar.
- Press on the **Rules** tab.
- Press **Create alert rule**.
#### **Define active period**
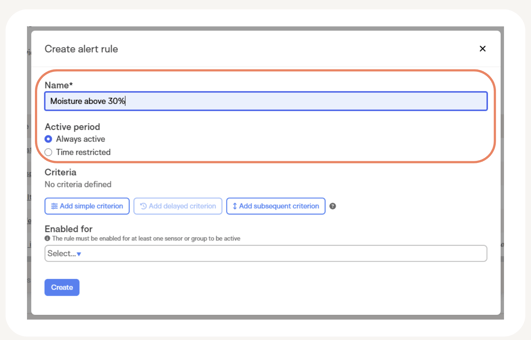
- You will be presented with a dialogue window, where you can configure the new alert rule.
- Start by filling out a name for the rule and selecting the active period. Select **Always active** if you want the alert rule to be active immediately and stay active all the time.
### 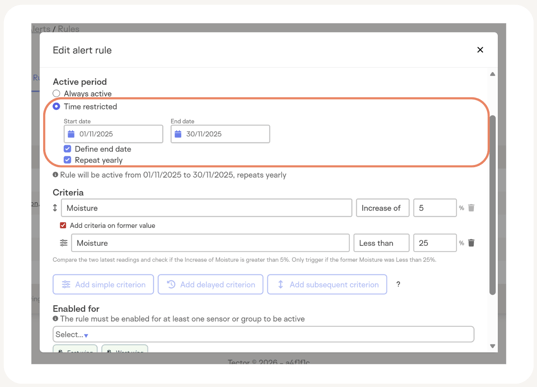
- Otherwise, you can select **Time restricted,** when you wantthe alert rule to start being active after a certain point in time (e.g. after sensors have been installed). You can also add an end date, for example, when a a certain part of the building is fully closed and you are no longer monitoring for a given criterion. You can also choose an alert rule to repeat yearly, if you are monitoring a seasonal phenomenon, such as summer condensation in warm roofs.
#### **Define criteria**
Start by selecting a type of measurement that should be monitored. You can choose between: moisture, temperature, humidity, amount of precipitation, outside temperature, and outside humidity. Then set a parameter for when an alert is triggered.
In the example above, an alert will be triggered when the moisture measurement exceeds 30%.
- #### Add Delayed criterion
#### 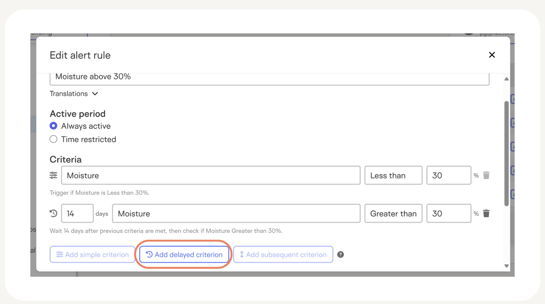
You can add a delayed criterion, which means that an alert will be triggered with a delay after a condition is met. In this case, we added a 14 days delay, which means that if 14 days after the first time the moisture reached 30%, the value is still the same or higher, then an alert will be triggered.
- #### Subsequent criterion
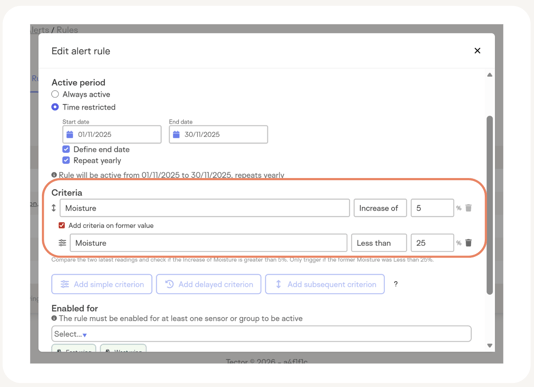
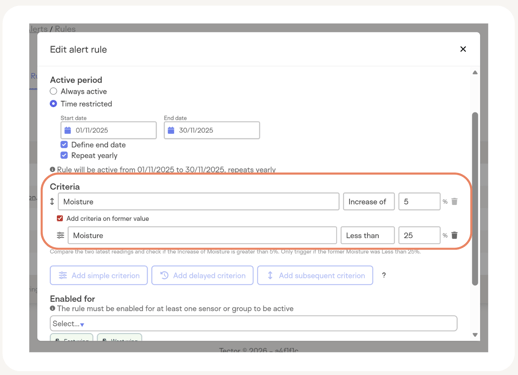
A subsequent criterion is used to compare the 2 latest values and if an increase or decrease is recorded of a given amount, then an alert is triggered. In the example above, the subsequent criterion is set to trigger an alert if there is an increase of 5% between the last two moisture measurements, but only if the former value is less than 25%.
#### **Enable newly created rule for a group or individual sensors:**
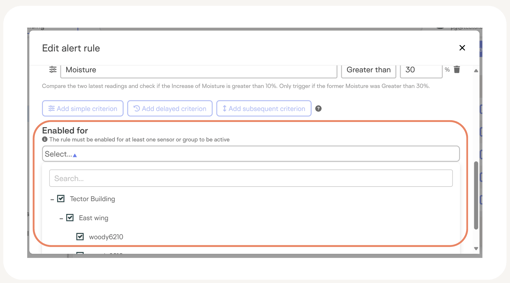
- Press **Enabled for** and from the dropdown menu select either the whole group, a subgroup, or individual sensors.
#### **Edit or delete alert rule**
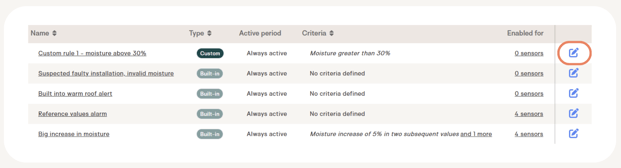
- To edit or delete an alert rule press on the edit icon to the right.
#### **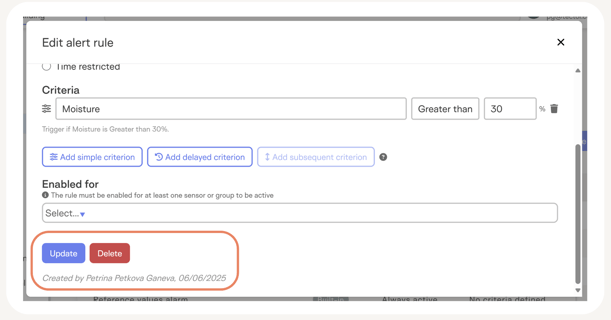**
- You will be presented with a dialogue window, where you can make any necessary changes, or delete the rule entirely. Furthermore, at the bottom of the window, you can see who created the rule and who last edited it.
#### **NOTE THAT:**
- **Custom alerts cannot be deleted if they are enabled for sensors.**
- **Built-in alerts cannot be edited or removed but you can choose, which devices they are enabled for.**
- [Getting started](https://help.tector.com/getting-started#main-content)
- [Download](https://help.tector.com/getting-started#download)
- [Prepare](https://help.tector.com/getting-started#prepare)
- [Installation for Generation 2 sensors](https://help.tector.com/getting-started#installation-for-generation-2-sensors)
- [Register](https://help.tector.com/getting-started#register)
- [Finalise](https://help.tector.com/getting-started#finalise)
- [General](https://help.tector.com/general)
- [FAQs](https://help.tector.com/faqs)
- [Hardware](https://help.tector.com/hardware#main-content)
- [General Info](https://help.tector.com/hardware#general-info)
- [Gateways](https://help.tector.com/hardware#gateways)
- [Sensors for flat roof](https://help.tector.com/hardware#sensors-for-flat-roof)
- [Sensors for monitoring on timber](https://help.tector.com/hardware#sensors-for-monitoring-on-timber)
- [Product Compliance Certification](https://help.tector.com/hardware#product-compliance-certification)
- [Software](https://help.tector.com/software#main-content)
- [Sensors](https://help.tector.com/software#sensors)
- [Groups](https://help.tector.com/software#groups)
- [Reports](https://help.tector.com/software#reports)
- [Alerts and alert rules](https://help.tector.com/software#alerts-and-alert-rules)
- [Blueprints](https://help.tector.com/software#blueprints)
- [Integrations](https://help.tector.com/software#integrations)
- [Timber](https://help.tector.com/timber)
- [Flat roofs](https://help.tector.com/flat-roofs)
[](https://www.tector.com/)
**Denmark office:** [Tranevej 16, 2400, København NV](https://maps.app.goo.gl/6J7ifZTRXgVtrEyWA)
[mailto:support@tector.com](mailto:support@tector.com)
Copyright © 2024,
```json
{
"@context" : "https://schema.org",
"@type" : "VideoObject",
"caption" : {
"@type" : "MediaObject",
"contentUrl" : "https://help.tector.com/media-transcripts/298141950172/en.vtt",
"inLanguage" : "en",
"name" : "en Captions"
},
"contentUrl" : "https://144490397.fs1.hubspotusercontent-eu1.net/hubfs/144490397/Help%20Centre%20Videos/How%20to%20set%20up%20alerts.mp4",
"dateModified" : "2025-11-19T10:14:45.134Z",
"duration" : "PT2M33.752S",
"height" : 2160,
"name" : "How to set up alerts",
"thumbnailUrl" : "https://144490397.fs1.hubspotusercontent-eu1.net/hubfs/144490397/Help%20Centre%20Videos/How%20to%20set%20up%20alerts.mp4/medium.jpg",
"uploadDate" : "2025-11-10T09:17:43.809Z",
"width" : 3840
}
```